<?xml version="1.0" encoding="utf-8"?><feed xmlns="http://www.w3.org/2005/Atom" ><generator uri="https://jekyllrb.com/" version="3.10.0">Jekyll</generator><link href="/dylbp.fyp.github.io/feed.xml" rel="self" type="application/atom+xml" /><link href="/dylbp.fyp.github.io/" rel="alternate" type="text/html" /><updated>2025-02-21T17:35:46+00:00</updated><id>/dylbp.fyp.github.io/feed.xml</id><title type="html">Delve: SBOM &amp;amp; VM Suite</title><subtitle>Delve is a fully fledged suite for Software Component Analysis (SCA) combined with a vulnerability management interface to enhance the developers workflow, and removing their worries of using vulnerable, out of date, and risky components.
</subtitle><entry><title type="html">User Flows in Delve</title><link href="/dylbp.fyp.github.io/progress/2025/02/21/user-flows.html" rel="alternate" type="text/html" title="User Flows in Delve" /><published>2025-02-21T15:21:02+00:00</published><updated>2025-02-21T15:21:02+00:00</updated><id>/dylbp.fyp.github.io/progress/2025/02/21/user-flows</id><content type="html" xml:base="/dylbp.fyp.github.io/progress/2025/02/21/user-flows.html"><![CDATA[<h2 id="key-user-flows-in-delve"><strong>Key User Flows in Delve</strong></h2>

<h3 id="1-user-authentication-flow"><strong>1. User Authentication Flow</strong></h3>

<p><strong>Objective:</strong> Allow users to sign up, log in, and gain secure access to their personalized data.</p>

<ul>
  <li>
    <p><strong>
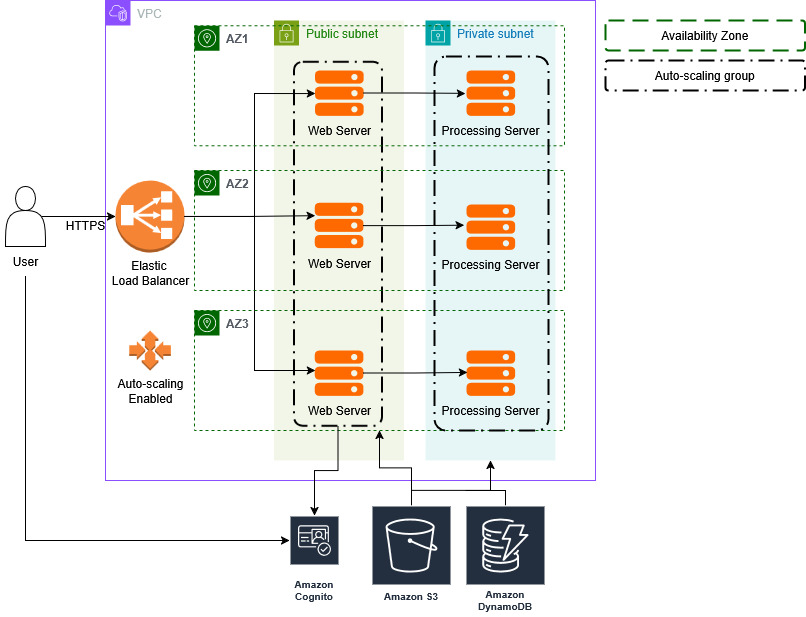
Step 1: User visits the application via HTTPS</strong><br />
 Users start by navigating to the Delve web interface.</p>
  </li>
  <li><strong>Step 2: User registers or logs in</strong><br />
 The user either signs up for a new account or logs in using their credentials.
    <ul>
      <li>The <strong>AWS Cognito</strong> service handles the user authentication, ensuring secure login.</li>
    </ul>
  </li>
  <li>
    <p><strong>Step 3: Token Generation</strong><br />
 Upon successful authentication, <strong>AWS Cognito</strong> issues an <strong>access token</strong> to the user, which will be used for accessing resources associated with their account.</p>
  </li>
  <li><strong>Step 4: User gains access to the dashboard</strong><br />
 The user is granted access to their personal dashboard, where they can view and manage their files, vulnerability reports, and SBOM data.</li>
</ul>

<hr />

<h3 id="2-file-upload-and-processing-flow"><strong>2. File Upload and Processing Flow</strong></h3>

<p><strong>Objective:</strong> Enable users to submit source code, containers, or SBOM files for vulnerability analysis and generate SBOMs.</p>

<ul>
  <li><strong>Step 1: User uploads a file (source code, container, or SBOM)</strong>
    <ul>
      <li>The user selects and uploads a file through the web interface.</li>
      <li>The file is passed to the <strong>API</strong> hosted on the <strong>backend processing server</strong> (via Express).</li>
    </ul>
  </li>
  <li><strong>Step 2: Data processing on the backend</strong>
    <ul>
      <li>The backend processes the file using <strong>Syft</strong> (for SBOM generation) and <strong>Grype</strong> (for vulnerability scanning).</li>
      <li>A <strong>DynamoDB</strong> entry is created with metadata about the file, including the vulnerabilities detected.</li>
    </ul>
  </li>
  <li><strong>Step 3: Output file and report creation</strong>
    <ul>
      <li>After processing, the output (SBOM file and/or vulnerability report) is saved to <strong>S3</strong>.</li>
      <li>The user’s <strong>DynamoDB</strong> entry is updated with links to the results (SBOM file, report, etc.).</li>
    </ul>
  </li>
  <li><strong>Step 4: Notification of completion</strong>
    <ul>
      <li>The user receives a notification that their file has been processed and the results are ready.</li>
    </ul>
  </li>
</ul>

<hr />

<h3 id="3-viewing-and-downloading-results-flow"><strong>3. Viewing and Downloading Results Flow</strong></h3>

<p><strong>Objective:</strong> Allow users to retrieve and view processed results, such as vulnerability reports or SBOM files.</p>

<ul>
  <li>
    <p><strong>Step 1: User navigates to the results page</strong><br />
 The user clicks on a link within their dashboard to view the results of their uploaded file.</p>
  </li>
  <li><strong>Step 2: User views vulnerability reports</strong>
    <ul>
      <li>The user is presented with a detailed vulnerability report that lists all detected issues within the software dependencies.</li>
      <li>Each issue includes additional information like severity, description, and recommendations for fixing the vulnerability.</li>
    </ul>
  </li>
  <li><strong>Step 3: User downloads SBOM or report</strong>
    <ul>
      <li>If the user wants to download their <strong>SBOM file</strong> or <strong>vulnerability report</strong>, they can click on a <strong>download link</strong>.</li>
      <li>The <strong>S3 bucket</strong> serves the requested file securely.</li>
    </ul>
  </li>
</ul>

<hr />

<h3 id="4-user-data-management-flow"><strong>4. User Data Management Flow</strong></h3>

<p><strong>Objective:</strong> Allow users to manage their files and vulnerabilities over time.</p>

<ul>
  <li>
    <p><strong>Step 1: User uploads new or additional files</strong><br />
 The user uploads additional files for analysis or revisits previous results to check for updates.</p>
  </li>
  <li><strong>Step 2: User manages or deletes files</strong>
    <ul>
      <li>The user can choose to delete or archive older files and reports from their dashboard, ensuring they only have relevant data available.</li>
      <li>Deleting files from the dashboard will remove entries from <strong>S3</strong> and <strong>DynamoDB</strong>.</li>
    </ul>
  </li>
  <li><strong>Step 3: User accesses historical data</strong><br />
 The user can view historical reports and SBOMs at any time by navigating through their dashboard, which presents a <strong>timeline</strong> of previously uploaded files and generated reports.</li>
</ul>

<hr />

<h3 id="5-authentication-and-authorization-for-file-access-flow"><strong>5. Authentication and Authorization for File Access Flow</strong></h3>

<p><strong>Objective:</strong> Ensure that users can only access their own files and data securely.</p>

<ul>
  <li>
    <p><strong>Step 1: Authentication via AWS Cognito</strong><br />
 Users authenticate using <strong>AWS Cognito</strong>, which ensures they have proper credentials to access the application.</p>
  </li>
  <li><strong>Step 2: File access control using user-specific tokens</strong><br />
 When requesting files or data, the <strong>access token</strong> attached to the user’s session will be checked.
    <ul>
      <li>The token ensures the user can only retrieve their files stored in <strong>S3</strong> and related entries in <strong>DynamoDB</strong>.</li>
      <li>If the user attempts to access someone else’s data, the request will be denied with an error response.</li>
    </ul>
  </li>
  <li><strong>Step 3: Data Access on the Frontend</strong><br />
 Once the user has been authenticated, the frontend will request data from the <strong>DynamoDB</strong> database and <strong>S3</strong>, but only for the files associated with their user ID.</li>
</ul>

<hr />

<h2 id="user-flow-diagram"><strong>User Flow Diagram</strong></h2>

<p>To visualize these flows, here is a diagram that shows the interaction between the key components of the system:</p>

<p><img src="/dylbp.fyp.github.io/assets/images/userflows.jpeg" alt="User Flow Diagram" /></p>

<hr />

<p>
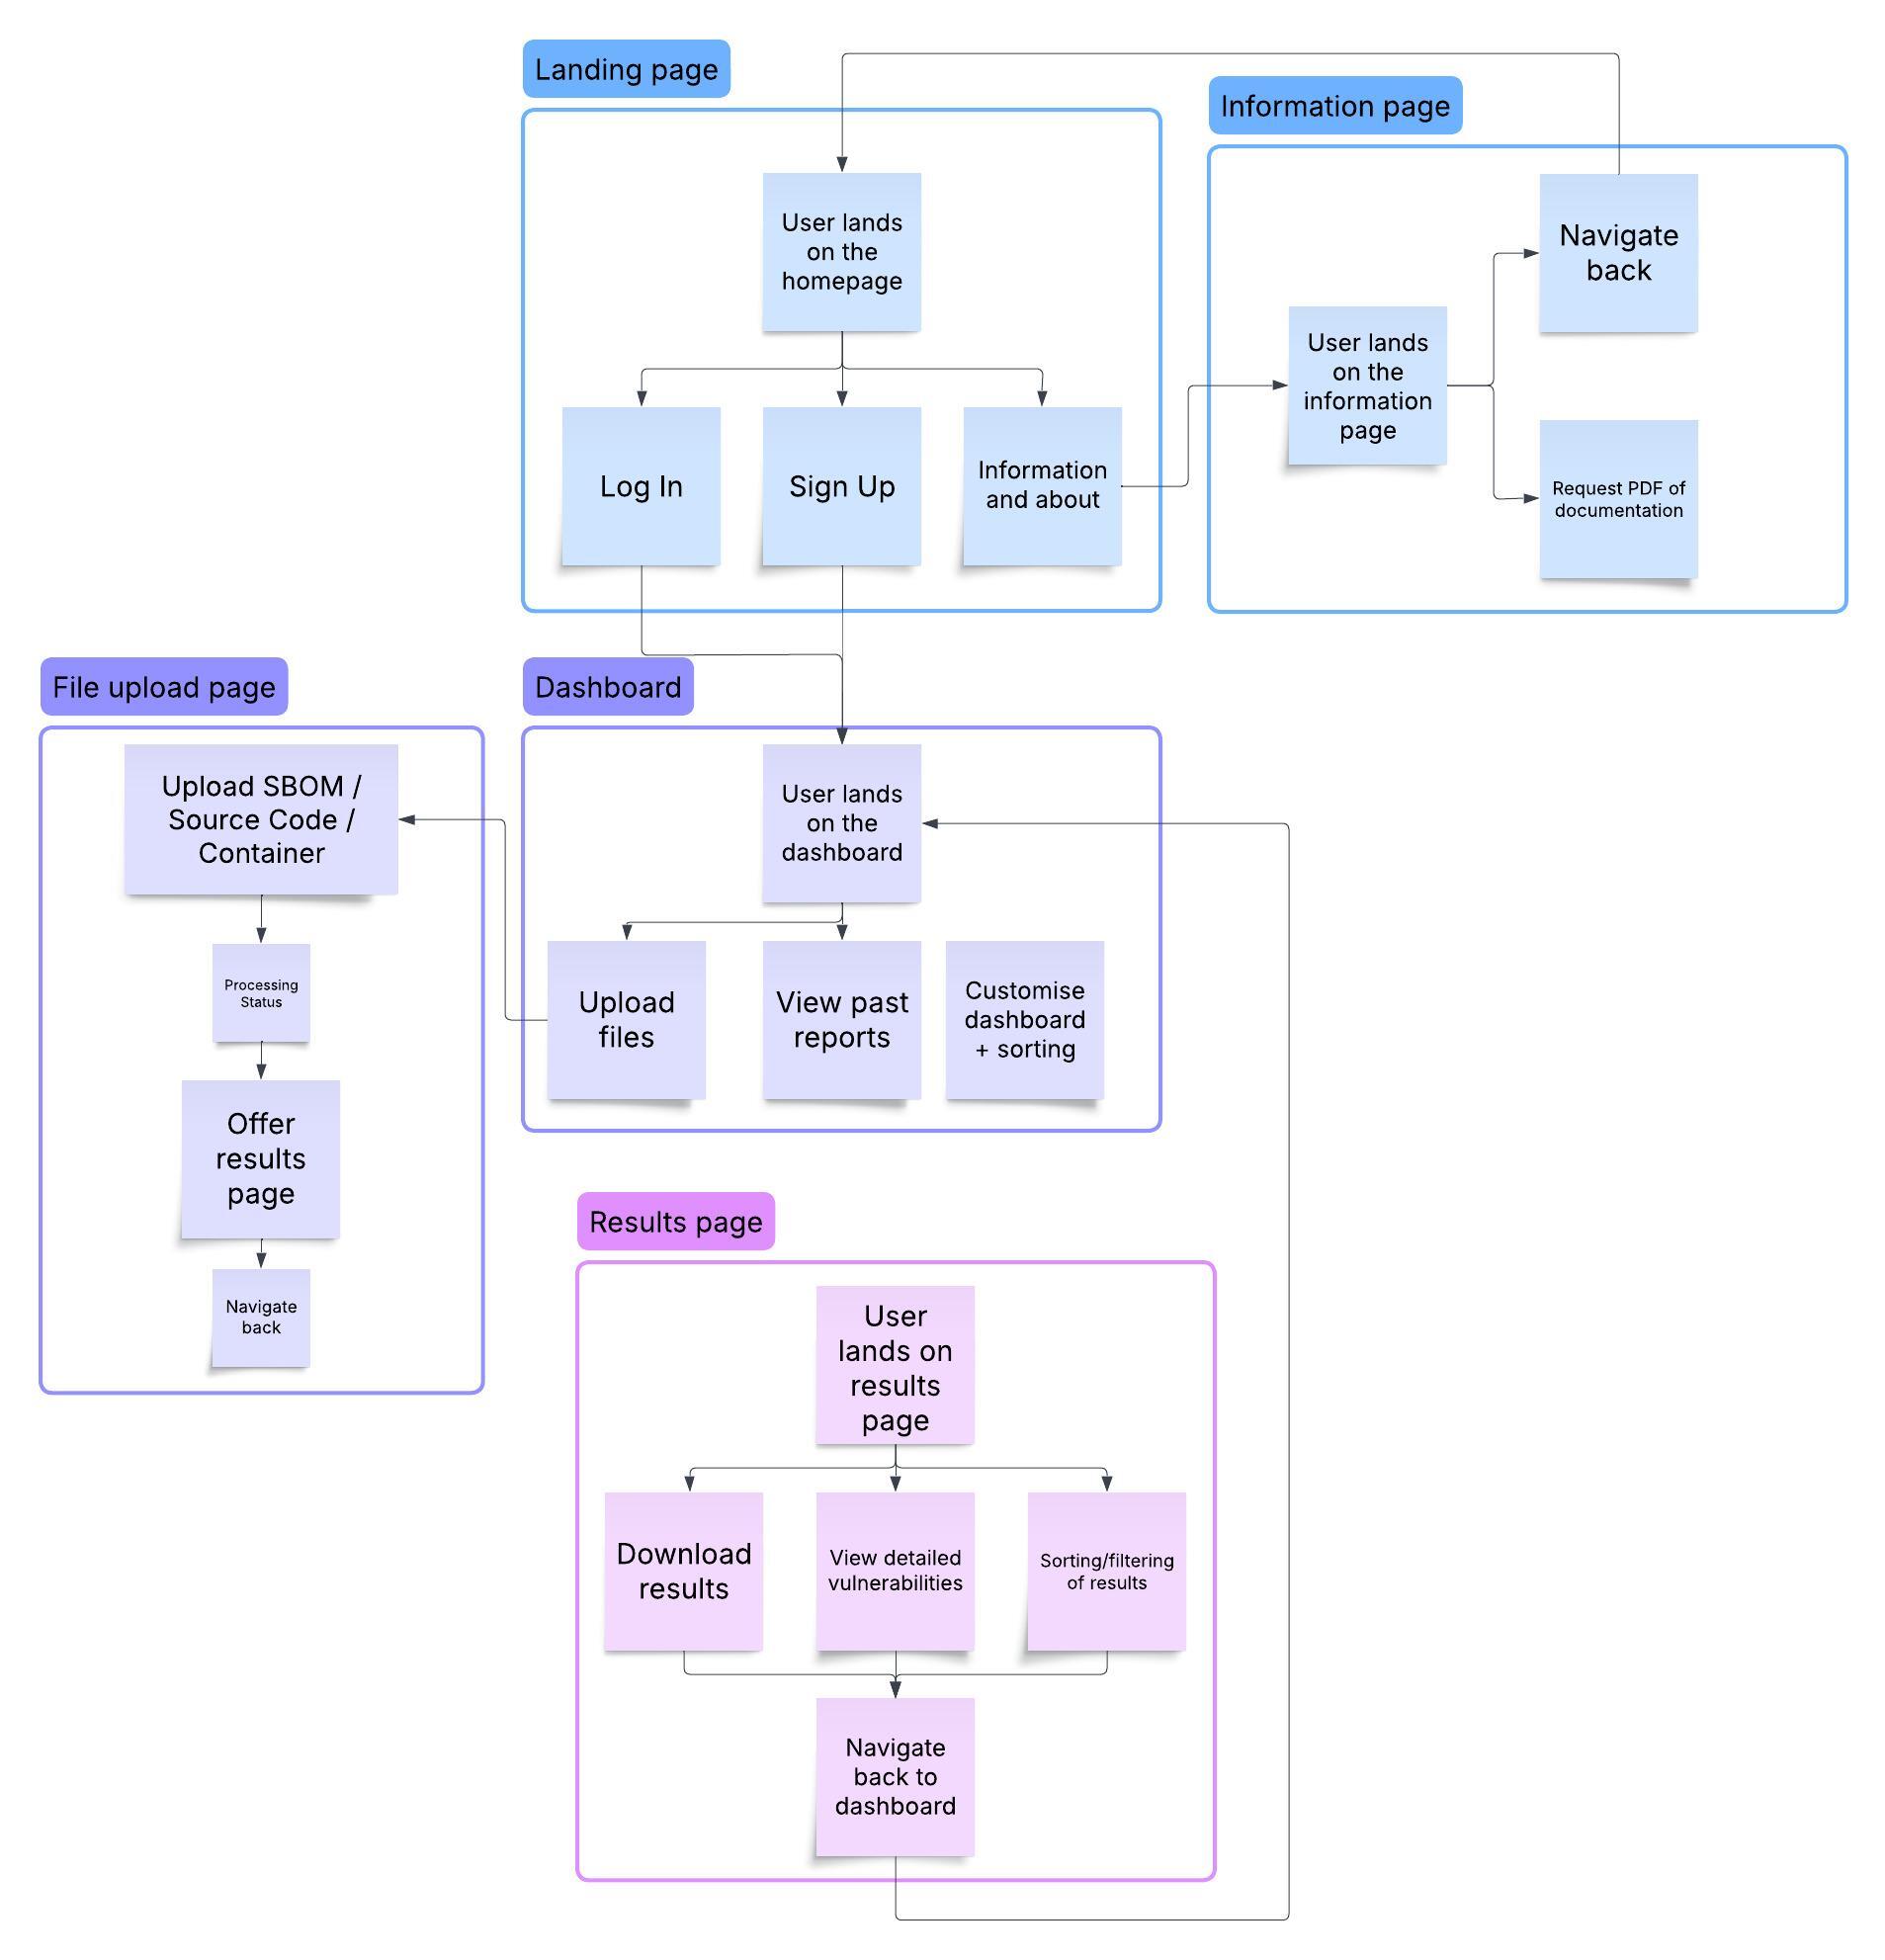
These user flows provide a clear, step-by-step guide for users interacting with Delve. From signing up and uploading files to accessing processed reports and managing their data, Delve ensures a streamlined, secure, and efficient experience for managing software vulnerabilities.</p>]]></content><author><name></name></author><category term="progress" /><summary type="html"><![CDATA[Key User Flows in Delve]]></summary></entry><entry><title type="html">Serving an API - Phase 1</title><link href="/dylbp.fyp.github.io/progress/2025/02/21/serving-the-api.html" rel="alternate" type="text/html" title="Serving an API - Phase 1" /><published>2025-02-21T13:07:02+00:00</published><updated>2025-02-21T13:07:02+00:00</updated><id>/dylbp.fyp.github.io/progress/2025/02/21/serving-the-api</id><content type="html" xml:base="/dylbp.fyp.github.io/progress/2025/02/21/serving-the-api.html"><![CDATA[<h3 id="-phase-1-setting-up-the-aws-infrastructure">🔧 <strong>Phase 1: Setting Up the AWS Infrastructure</strong></h3>
<p>For the initial testing phase of my project, I focused on setting up the necessary <strong>AWS infrastructure</strong> to process and parse application source code, while serving the results over an API.</p>

<p>I started by testing the infrastructure with <strong>Flask</strong> to ensure proper configuration, but have since migrated to a <strong>Node.js API</strong> for scalability and flexibility.</p>

<h3 id="️-server-setup">🖥️ <strong>Server Setup</strong></h3>
<p>The EC2 instance, which acts as both the <strong>Processing</strong> and <strong>API Server</strong>, has the following binaries installed:</p>

<ul>
  <li><strong>Syft</strong> — For generating SBOMs from source code, artifacts, and containers.</li>
  <li><strong>Grype</strong> — For scanning SBOMs for known vulnerabilities.</li>
  <li><strong>Delve</strong> — My custom vulnerability management interface.</li>
  <li><strong>Node.js &amp; NPM</strong>
    <ul>
      <li><strong>pm2</strong> — Process manager to keep the Node.js API running smoothly.</li>
      <li><strong>Express</strong> — Web framework to handle API requests.</li>
      <li><strong>dotenv</strong> — Securely managing environment variables.</li>
      <li><strong>path</strong> — Path utilities for file handling.</li>
    </ul>
  </li>
</ul>

<h3 id="-initial-testing--results">🚀 <strong>Initial Testing &amp; Results</strong></h3>
<p>During this phase, I was able to successfully:</p>
<ol>
  <li><strong>Communicate</strong> with the API hosted on AWS from my local machine.</li>
  <li><strong>Upload</strong> source code or dependencies for processing.</li>
  <li><strong>Retrieve the results</strong> from the API, including SBOMs and vulnerability reports.</li>
</ol>

<p>This was a promising start, demonstrating that the infrastructure was working as expected and the API was responding correctly.</p>

<h3 id="-next-steps-adding-authentication">🔐 <strong>Next Steps: Adding Authentication</strong></h3>
<p>While the testing phase has been successful, the next step is to introduce <strong>authentication</strong> to the API. Specifically, each user should only be able to access and interact with the files they have personally processed.</p>

<p>My plan for this phase:</p>
<ul>
  <li><strong>Implement user authentication</strong> using <strong>AWS Cognito</strong> and JWT Bearer Tokens.</li>
  <li><strong>Ensure file access control</strong>, allowing users to only retrieve files they uploaded or processed.</li>
</ul>

<p>This will significantly enhance the security and usability of the API, allowing for safe, personalized access to the data.</p>

<h3 id="-early-implementation-of-the-api">💻 <strong>Early Implementation of the API</strong></h3>

<p>Below is an early implementation of the <strong>Node.js API</strong> for serving uploaded files:</p>

<div class="language-javascript highlighter-rouge"><div class="highlight"><pre class="highlight"><code><span class="kd">const</span> <span class="nx">express</span> <span class="o">=</span> <span class="nx">require</span><span class="p">(</span><span class="dl">"</span><span class="s2">express</span><span class="dl">"</span><span class="p">);</span>
<span class="kd">const</span> <span class="nx">path</span> <span class="o">=</span> <span class="nx">require</span><span class="p">(</span><span class="dl">"</span><span class="s2">path</span><span class="dl">"</span><span class="p">);</span>
<span class="kd">const</span> <span class="nx">dotenv</span> <span class="o">=</span> <span class="nx">require</span><span class="p">(</span><span class="dl">"</span><span class="s2">dotenv</span><span class="dl">"</span><span class="p">);</span>

<span class="nx">dotenv</span><span class="p">.</span><span class="nx">config</span><span class="p">();</span>

<span class="kd">const</span> <span class="nx">app</span> <span class="o">=</span> <span class="nx">express</span><span class="p">();</span>
<span class="kd">const</span> <span class="nx">port</span> <span class="o">=</span> <span class="nx">process</span><span class="p">.</span><span class="nx">env</span><span class="p">.</span><span class="nx">PORT</span> <span class="o">||</span> <span class="mi">3000</span><span class="p">;</span>

<span class="c1">// Directory for stored files</span>
<span class="kd">const</span> <span class="nx">FILES_DIR</span> <span class="o">=</span> <span class="nx">path</span><span class="p">.</span><span class="nx">join</span><span class="p">(</span><span class="nx">__dirname</span><span class="p">,</span> <span class="dl">"</span><span class="s2">files</span><span class="dl">"</span><span class="p">);</span>

<span class="c1">// Serve static files</span>
<span class="nx">app</span><span class="p">.</span><span class="nx">use</span><span class="p">(</span><span class="dl">"</span><span class="s2">/files</span><span class="dl">"</span><span class="p">,</span> <span class="nx">express</span><span class="p">.</span><span class="kd">static</span><span class="p">(</span><span class="nx">FILES_DIR</span><span class="p">));</span>

<span class="c1">// API to download a file</span>
<span class="nx">app</span><span class="p">.</span><span class="kd">get</span><span class="p">(</span><span class="dl">"</span><span class="s2">/download/:filename</span><span class="dl">"</span><span class="p">,</span> <span class="p">(</span><span class="nx">req</span><span class="p">,</span> <span class="nx">res</span><span class="p">)</span> <span class="o">=&gt;</span> <span class="p">{</span>
    <span class="kd">const</span> <span class="nx">filePath</span> <span class="o">=</span> <span class="nx">path</span><span class="p">.</span><span class="nx">join</span><span class="p">(</span><span class="nx">FILES_DIR</span><span class="p">,</span> <span class="nx">req</span><span class="p">.</span><span class="nx">params</span><span class="p">.</span><span class="nx">filename</span><span class="p">);</span>
    <span class="nx">res</span><span class="p">.</span><span class="nx">download</span><span class="p">(</span><span class="nx">filePath</span><span class="p">,</span> <span class="p">(</span><span class="nx">err</span><span class="p">)</span> <span class="o">=&gt;</span> <span class="p">{</span>
        <span class="k">if</span> <span class="p">(</span><span class="nx">err</span><span class="p">)</span> <span class="p">{</span>
            <span class="nx">res</span><span class="p">.</span><span class="nx">status</span><span class="p">(</span><span class="mi">404</span><span class="p">).</span><span class="nx">json</span><span class="p">({</span> <span class="na">error</span><span class="p">:</span> <span class="dl">"</span><span class="s2">File not found</span><span class="dl">"</span> <span class="p">});</span>
        <span class="p">}</span>
    <span class="p">});</span>
<span class="p">});</span>

<span class="c1">// Start the server</span>
<span class="nx">app</span><span class="p">.</span><span class="nx">listen</span><span class="p">(</span><span class="nx">port</span><span class="p">,</span> <span class="p">()</span> <span class="o">=&gt;</span> <span class="p">{</span>
    <span class="nx">console</span><span class="p">.</span><span class="nx">log</span><span class="p">(</span><span class="s2">`File API running on port </span><span class="p">${</span><span class="nx">port</span><span class="p">}</span><span class="s2">`</span><span class="p">);</span>
<span class="p">});</span>
</code></pre></div></div>

<hr />

<p><em>For the next update, I’ll be looking into the authentication process and how I plan to enforce these security measures.</em></p>]]></content><author><name></name></author><category term="progress" /><summary type="html"><![CDATA[🔧 Phase 1: Setting Up the AWS Infrastructure For the initial testing phase of my project, I focused on setting up the necessary AWS infrastructure to process and parse application source code, while serving the results over an API.]]></summary></entry><entry><title type="html">Architecture of Delve</title><link href="/dylbp.fyp.github.io/progress/2025/02/20/the-infrastructure.html" rel="alternate" type="text/html" title="Architecture of Delve" /><published>2025-02-20T17:44:02+00:00</published><updated>2025-02-20T17:44:02+00:00</updated><id>/dylbp.fyp.github.io/progress/2025/02/20/the-infrastructure</id><content type="html" xml:base="/dylbp.fyp.github.io/progress/2025/02/20/the-infrastructure.html"><![CDATA[<h2 id="aws-architecture-overview"><strong>AWS Architecture Overview</strong></h2>

<p>This diagram outlines the backend architecture of the <strong>Delve</strong> application, focusing on scalability, security, and ease of use.</p>

<p><img src="/dylbp.fyp.github.io/assets/images/AWS%20Architecture%20Diagram.jpg" alt="AWS Architecture" /></p>

<h3 id="high-level-flow"><strong>High-Level Flow</strong></h3>
<ol>
  <li><strong>User Access:</strong>
    <ul>
      <li>Users connect to the application over <strong>HTTPS</strong>, ensuring secure communication.</li>
      <li>The traffic is first routed to an <strong>Elastic Load Balancer (ELB)</strong>, which balances the workload across multiple instances to provide scalability.</li>
    </ul>
  </li>
  <li><strong>Authentication:</strong>
    <ul>
      <li>Upon visiting the application, users will <strong>sign up</strong> or <strong>log in</strong>.</li>
      <li><strong>AWS Cognito</strong> will handle user authentication, validating their identity and issuing <strong>access tokens</strong>.</li>
      <li>These access tokens are used to grant users access to their specific data and reports stored in the <strong>DynamoDB</strong> database.</li>
    </ul>
  </li>
  <li><strong>Data Access &amp; Retrieval:</strong>
    <ul>
      <li>When users request a specific report, the web server fetches the relevant data from <strong>DynamoDB</strong>.</li>
      <li>For users requesting downloadable files (such as SBOMs or detailed reports), files are served directly from the <strong>S3 Bucket</strong>.</li>
    </ul>
  </li>
  <li><strong>Data Submission &amp; Processing:</strong>
    <ul>
      <li>Users can submit <strong>application source code</strong>, <strong>containers</strong>, or <strong>SBOMs</strong> to the platform.</li>
      <li>These submissions are sent to the <strong>backend processing server</strong> through an <strong>Express API</strong> running on the server.</li>
      <li>The <strong>user ID</strong> is passed along with the data to ensure proper association with their account.</li>
    </ul>
  </li>
  <li><strong>Data Storage:</strong>
    <ul>
      <li>After the backend processes the user-submitted data (e.g., generating SBOMs and vulnerability reports), the resulting input and output files are saved in <strong>S3</strong> for storage.</li>
      <li>The <strong>DynamoDB</strong> database is updated with an entry containing metadata about the processed data, such as the generated SBOM and vulnerability report.</li>
    </ul>
  </li>
  <li><strong>User Dashboard:</strong>
    <ul>
      <li>Users can access a comprehensive <strong>dashboard</strong> that displays the dependencies within their applications, helping them monitor and manage their software’s security.</li>
      <li>The dashboard allows users to easily identify vulnerabilities, outdated components, and take necessary actions to maintain their applications.</li>
    </ul>
  </li>
</ol>

<hr />]]></content><author><name></name></author><category term="progress" /><summary type="html"><![CDATA[AWS Architecture Overview]]></summary></entry><entry><title type="html">What is the goal for Delve?</title><link href="/dylbp.fyp.github.io/information/2025/02/20/what-is-the-goal.html" rel="alternate" type="text/html" title="What is the goal for Delve?" /><published>2025-02-20T17:44:02+00:00</published><updated>2025-02-20T17:44:02+00:00</updated><id>/dylbp.fyp.github.io/information/2025/02/20/what-is-the-goal</id><content type="html" xml:base="/dylbp.fyp.github.io/information/2025/02/20/what-is-the-goal.html"><![CDATA[<p><strong>Delve</strong> aims to be a unified platform for <strong>Software Composition Analysis (SCA)</strong> and streamlined <strong>vulnerability management</strong>, enabling faster remediation times through an intuitive interface.</p>

<h3 id="️-core-objective">🛠️ <strong>Core Objective</strong></h3>
<p>To empower developers with an easy-to-use tool that simplifies the process of identifying and managing vulnerabilities in their software stack.</p>

<h3 id="-how-it-works">📂 <strong>How It Works</strong></h3>
<p>Developers can upload any of the following:</p>
<ul>
  <li>📁 <strong>Raw Source Code</strong></li>
  <li>📦 <strong>Dependency Artifacts</strong></li>
  <li>🐳 <strong>Containers</strong></li>
</ul>

<p>Delve will then:</p>
<ol>
  <li><strong>Generate a Software Bill of Materials (SBOM)</strong> using <a href="https://github.com/anchore/syft"><strong>Syft</strong></a> — a powerful tool for extracting accurate package data from code, artifacts, and containers.</li>
  <li><strong>Scan for vulnerabilities</strong> using <a href="https://github.com/anchore/grype"><strong>Grype</strong></a>, which cross-references known vulnerabilities against the SBOM.</li>
  <li><strong>Produce an actionable vulnerability report</strong> that highlights security risks in a clear, developer-friendly format.</li>
  <li><strong>Integrate findings</strong> into the <strong>Vulnerability Management Interface</strong> and store them in the platform’s database for ongoing tracking and remediation.</li>
</ol>

<h3 id="-why-delve">🚀 <strong>Why Delve?</strong></h3>
<ul>
  <li>✅ <strong>Automation-first</strong> — Reduces manual overhead in vulnerability tracking.</li>
  <li>✅ <strong>Clear Reporting</strong> — Presents vulnerabilities in an easy-to-understand format.</li>
  <li>✅ <strong>Unified Workflow</strong> — From SBOM generation to remediation, all in one platform.</li>
</ul>

<hr />

<p><em>Delve simplifies security so developers can focus on building, not fixing.</em></p>]]></content><author><name></name></author><category term="information" /><summary type="html"><![CDATA[Delve aims to be a unified platform for Software Composition Analysis (SCA) and streamlined vulnerability management, enabling faster remediation times through an intuitive interface.]]></summary></entry></feed>